Wednesday, November 22, 2017
Nikon Super coolscan 4000 ed on windows 10
sources
http://blog.controlspace.org/2010/05/nikon-scan-on-windows-7-and-vista-64.html
https://axelriet.blogspot.com/2009/10/nikon-ls-40-ls-50-ls-5000-scanners-on.html
https://www.nikonimgsupport.com/na/NSG_article?articleNo=000026780&configured=1&lang=en_SG
desktop running windows 10 with firewire (1394) connection
basic steps to load nikon scan software
with scanner OFF
- download and install nikon software 4.0.3 (ns403en_vista.exe - see 3rd source above or google nikon 4.0.3)
- modify .inf file.; in my case i edited the Nks1394.INF file located in c:/program files(x86)/common files/nikon/driver/scan1394 directory. (text i used located)
turn scanner ON
- reboot windows allowing it to use unsigned drivers (write this down) settings/update and security/recovery/under advanced start up/restart now/ then press f7 during windows startup
- update driver. scanner should be visible in device manager under imaging devices as
Nikon SUPER COOLSCAN 4000 ED. choose browse my computer and navigate to the updated inf file
- software should now recognize scanner and work
[note - need to replace & with & in below]
; Nks1394.INF -- Windows Still Image Setup File of
; Nikon 1394 Scanners for Windows ME/2000/XP
; Copyright (C) Nikon Corporation 2003
; Manufacturer: Nikon Corporation
; scanners.inf - Windows Still Image Setup File
; modified inf file
[Version]
Signature="$CHICAGO$"
Class=Image
ClassGUID={6bdd1fc6-810f-11d0-bec7-08002be2092f}
Provider=%Provider%
DriverVer=1/1/2009,1.0
[Manufacturer]
%Mfg%=Models,ntamd64
[Models]
; USB scanners
"Nikon LS-40" = USBScanner,USB\Vid_04b0&Pid_4000
"Nikon LS-50" = USBScanner,USB\Vid_04b0&Pid_4001
"Nikon LS-5000" = USBScanner,USB\Vid_04b0&Pid_4002
; Firewire scanners
"Firewire Scanner" = SBP2Scanner,SBP2\GenScanner
"Nikon SUPER COOLSCAN 4000 ED" = SBP2Scanner_NIKON,SBP2\NIKON___&LS-4000_ED______&CMDSETID104D8
"Nikon SUPER COOLSCAN 8000 ED" = SBP2Scanner_NIKON,SBP2\NIKON___&LS-8000_ED______&CMDSETID104D8
"Nikon SUPER COOLSCAN 9000 ED" = SBP2Scanner_NIKON,SBP2\NIKON___&LS-9000_ED______&CMDSETID104D8
;---------------- Duplicated from [Models]
[Models.ntamd64]
; USB scanners
"Nikon LS-40" = USBScanner,USB\Vid_04b0&Pid_4000
"Nikon LS-50" = USBScanner,USB\Vid_04b0&Pid_4001
"Nikon LS-5000" = USBScanner,USB\Vid_04b0&Pid_4002
; Firewire scanners
"Firewire Scanner" = SBP2Scanner,SBP2\GenScanner
"Nikon SUPER COOLSCAN 4000 ED" = SBP2Scanner_NIKON,SBP2\NIKON___&LS-4000_ED______&CMDSETID104D8
"Nikon SUPER COOLSCAN 8000 ED" = SBP2Scanner_NIKON,SBP2\NIKON___&LS-8000_ED______&CMDSETID104D8
"Nikon SUPER COOLSCAN 9000 ED" = SBP2Scanner_NIKON,SBP2\NIKON___&LS-9000_ED______&CMDSETID104D8
;---------------- USBScanner -------------------------
[USBScanner]
Include=sti.inf
Needs=STI.USBSection
SubClass=StillImage
DeviceType=1
DeviceSubType=1
Capabilities=0
[USBScanner.Services]
Include=sti.inf
Needs=STI.USBSection.Services
;---------------- SBP2Scanner ------------------------
[SBP2Scanner]
Include=sti.inf
Needs=STI.SBP2Section
SubClass=StillImage
DeviceType=1
DeviceSubType=2
Capabilities=0
[SBP2Scanner_NIKON]
Include=sti.inf
Needs=STI.SBP2Section
SubClass=StillImage
DeviceType=1
DeviceSubType=2
Capabilities=0
AddReg=NK1394SCN.AddReg
CopyFiles=NK1394SCN.CopyUSDFiles
[SBP2Scanner.Services]
Include=sti.inf
Needs=STI.SBP2Section.Services
[SBP2Scanner_NIKON.Services]
Include=sti.inf
Needs=STI.SBP2Section.Services
[NK1394SCN.AddReg]
HKR,,HardwareConfig,1,2
HKR,,DevLoader,,*NTKERN
HKR,,NTMPDriver,,"scsiscan.sys"
HKR,DeviceData,ICMProfile,1,0,0
HKR,,USDClass,,"{07C71AC0-FA90-11d3-B409-00C04F87578E}"
HKCR,CLSID\{07C71AC0-FA90-11d3-B409-00C04F87578E},,,"Nikon STI USD"
HKCR,CLSID\{07C71AC0-FA90-11d3-B409-00C04F87578E}\InProcServer32,,,%11%\NKSCNUSD.DLL
HKCR,CLSID\{07C71AC0-FA90-11d3-B409-00C04F87578E}\InProcServer32,ThreadingModel,,"Both"
[SourceDisksNames]
1=%DiskName%,,
[SourceDisksFiles]
NKSCNUSD.dll=1
[DestinationDirs]
NK1394SCN.CopyUSDFiles=11
[NK1394SCN.CopyUSDFiles]
NKSCNUSD.dll,,,32
;-----------------------------------------------------
[Strings]
Provider="steelchn@gmail.com"
Mfg="DIY Software"
DiskName="Nikon Scan 4 CD-ROM"
;========================= End of scanners.inf ===============================
Saturday, November 4, 2017
google voice raspberry pi [pygooglevoice]
using pip install pygooglevoice i got an error something like
galx = re.search(r"name=\"GALX\"\s+value=\"(.+)\"", content).group(1)AttributeError: 'NoneType' object has no attribute 'group'
it worked when i download pygooglevoice-master fromhttps://github.com/pettazz/pygooglevoice
copy files into lib/site-packages from pygooglevoice foldersudo python setup.py install
Monday, October 2, 2017
Gopro Hero 5 tips & tricks
Copy files from Gopro to windows 10 PC retaining file creation date - use sd card reader vice copying from hero connected via usb. richcopy utility seems faster than drag/drop from windows 10
in case it gets lost - create a jpg file with your return info and save in root directory on sd card as readme.jpg. a long shot but at least info is there if someone tries to look for the owner.
in case it gets lost - create a jpg file with your return info and save in root directory on sd card as readme.jpg. a long shot but at least info is there if someone tries to look for the owner.
Wednesday, September 27, 2017
Miata NA Horn Button Repair

My left horn button was working so this narrowed it down to the right horn button or wiring. i did not have to remove the steering wheel or mess with the airbag
Step 1 - pry out the button. I used a plastic trim remover tool. as others have stated, patience and persistence. working around the edges it slowly starts to come out. used a fair amount of force pushing up/down against the bottom/top of plastic button then towards me.

This is the tab (one on the top one on the bottom) that holds the button into place.
i was getting 12v across the wires so power was good. after removal, i was getting resistance across the wires when the button was depressed so that confirmed it was the button
i tried the spraying electrical cleaner advice - multiple times over several days and button presses (100) with no joy.
Step 2 - from the back side push the tabs in and up. i only needed to do three so did not have to deal with the one under the connectors. you can do this sequentially.


Step 3 - used sandpaper to clean the copper connectors on each side.


Step 4 - confirm resistance goes to zero when pressed. you can remove the circular connector on the back side of the button which allows you to press it against the other side without having to snap it back together before confirming good connectivity
Step 5 - re install the button, enjoy a sense of accomplishment and try to forget about your $10 ebay purchase of new (to me) buttons w/ wiring. it was knowing i had a new button coming that allowed me to try and separate the existing button. while hinted at in one post, was not obvious to me.
Sunday, September 17, 2017
Raspberry Pi projects
Hardware: Raspberry Pi 3, webcam, ip camera
Software: NOOBS 2.4.3 Raspian (Jessie stretch)
Note: Use a power supply vice a iphone or other "charger". the led should be solid RED indicating good power vice blinking.
- record motion triggered surveillance video to NAS from webcam & ip camera using motion/motioneye.
- text me my estimated morning/evening commute time using google maps api
- email me the weather forecast if there is a chance of rain
- plot surf tracks on google earth using garmin vivoactive hr lat/lon data
- monitor cable modem data to troubleshoot connectivity issues
Software: NOOBS 2.4.3 Raspian (Jessie stretch)
Note: Use a power supply vice a iphone or other "charger". the led should be solid RED indicating good power vice blinking.
Current Projects
- record motion triggered surveillance video to NAS from webcam & ip camera using motion/motioneye.
- text me my estimated morning/evening commute time using google maps api
- email me the weather forecast if there is a chance of rain
- plot surf tracks on google earth using garmin vivoactive hr lat/lon data
Past projects
- monitor cable modem data to troubleshoot connectivity issues
Sunday, July 9, 2017
Miata NA rear finish panel replacement
went with fiberglass replacement from goodwin as it was local.
http://www.good-win-racing.com/Mazda-Performance-Part/30-1132RFBF.html?gclid=CKHjruDj_dQCFUtNfgodPkME9w
couple of videos i found useful (sort of)
https://www.youtube.com/watch?v=76TDdLHXebA&t=633s
https://www.youtube.com/watch?v=2cxi3YmecRA
https://www.miata.net/hakuna/shavebadge.html
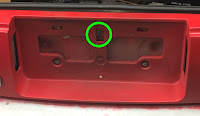
Original panel was cracked (joys of street street parking) so was not worried about being careful during removal. Only part to watch out for is after removing all the nuts, and fasteners, lift up as there is a slot in the top center of the license plate area (green circle).
Couple of items not mentioned in various reference materials
 I was having a hard time removing the white electrical connector (left). Figured out you do not need to, simply remove the turn signal light (grey) .
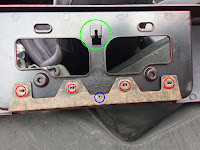
The original rear finish panel has a metal stiffener plate on the back side. It is held on by four pinch washers that attach to short posts (red circles) and one rivet (blue circle). I removed from the old panel and installed on the new one.
The green circle shows the back side of the slot that requires you to lift up for removal and push down (gently) for installation.
 1/8 in diameter rivet. had to drill the old one out.

Used Dupli-Color BGM0398 Bright Red General Motors Exact-Match
1st time using "rattle can". Did not prep the panel and was very happy with the result. take your time and use an enclosed space (i..e garage) to avoid small particles floating in the wind.
Did not have the same luck with the clear coat. Maybe just a bad can but did not spray on evenly.
http://www.good-win-racing.com/Mazda-Performance-Part/30-1132RFBF.html?gclid=CKHjruDj_dQCFUtNfgodPkME9w
couple of videos i found useful (sort of)
https://www.youtube.com/watch?v=76TDdLHXebA&t=633s
https://www.youtube.com/watch?v=2cxi3YmecRA
https://www.miata.net/hakuna/shavebadge.html
Original panel was cracked (joys of street street parking) so was not worried about being careful during removal. Only part to watch out for is after removing all the nuts, and fasteners, lift up as there is a slot in the top center of the license plate area (green circle).

Couple of items not mentioned in various reference materials
 I was having a hard time removing the white electrical connector (left). Figured out you do not need to, simply remove the turn signal light (grey) .
The original rear finish panel has a metal stiffener plate on the back side. It is held on by four pinch washers that attach to short posts (red circles) and one rivet (blue circle). I removed from the old panel and installed on the new one.
The green circle shows the back side of the slot that requires you to lift up for removal and push down (gently) for installation.
 1/8 in diameter rivet. had to drill the old one out.
miata badge - used fishing line to cut through two sided tape (patience)
mazda badge - two posts are held in place by caulk/glue. from the back, used a drill bit to work the posts free. on the new panel, drilled 1/8 inch holes to secure the posts on the badge.


Used Dupli-Color BGM0398 Bright Red General Motors Exact-Match
1st time using "rattle can". Did not prep the panel and was very happy with the result. take your time and use an enclosed space (i..e garage) to avoid small particles floating in the wind.
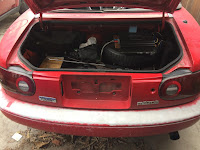
The panel is slightly off center on the horizontal axis. About 1/4 inch. read others had the same issue. probably could have drilled out the center slot (green circle above) to provide some adjustment. Only noticeable up close in two places if you are looking for it. Gap below the driver side tail light and the key hole is slightly off center.
overall very happy with the result. now I do need to get after repainting the bumper.....
overall very happy with the result. now I do need to get after repainting the bumper.....
Sunday, June 25, 2017
Surf Tracker Garmin Vivoactive HR [update]
update 9/19/18
basically finished modifying python scripts to batch download .fit files from the garmin IQ web site, extract the raw data, and convert to kml files to view on google earth.
just recently back to comparing extracted .fit data with gopro video files in order to tweak algorithm. a bit tedious as have over 700 waves. hope to update results in the next few weeks.
my focus is on speed and distance profiles vice minimums.
+ + + + + + +
some observations comparing the wave file generated by the app and what I get when processing the raw data (extracted from the tcx file). I only recently installed surf tracker 2 so will update once I get some rides in.
In applying the wave logic used by the app (e.g. minimum speed [9 kph], minimum ride time [6 seconds], at least speed [13 kph]) to the raw data there was
high correlation in # of waves (80 out of 82) and max speed of wave (72/82 exact match, 77/82 within .1 kph (rounding?)).
medium correlation for ride time. Same for 55 of 82 and 63 of 82 within 2 seconds
medium correlation for wave distance when ride time matched. -23% to +13% when time matched (52 waves)
Since, with exception of # of waves caught and max speed of those waves, there are significant discrepancies in the ride time and distance when post processing raw data i conclude they must be due to applying the algorithm in real time vice after the fact.
However, I did capture a significant number of waves on a gopro so was able to review the video in an attempt to validate the wave ride time. For the largest discrepancies (difference of more than 4 seconds) the raw data had zero's in the speed, lat and long for the difference in time. For example, raw data had valid data for ride time of 18 seconds, then zero's for an additional 15 seconds (most of which the watch was under water). The app recorded the ride time as 33 seconds so it may be the app logic continues to give credit for ride time until a valid (i.e. non zero) speed is below the minimum.
At the moment I do not have a hypothesis about the discrepancies in wave distance. The majority are shorter on the app than post processing (10 longer , 45 shorter when waver ride time was same)
I have updated my python code to capture the time zone and street location of each wave. time zone was necessary to correct to local time as tcx time data is gmt.
Sunday, February 12, 2017
Surf Tracker Garmin Vivoactive HR
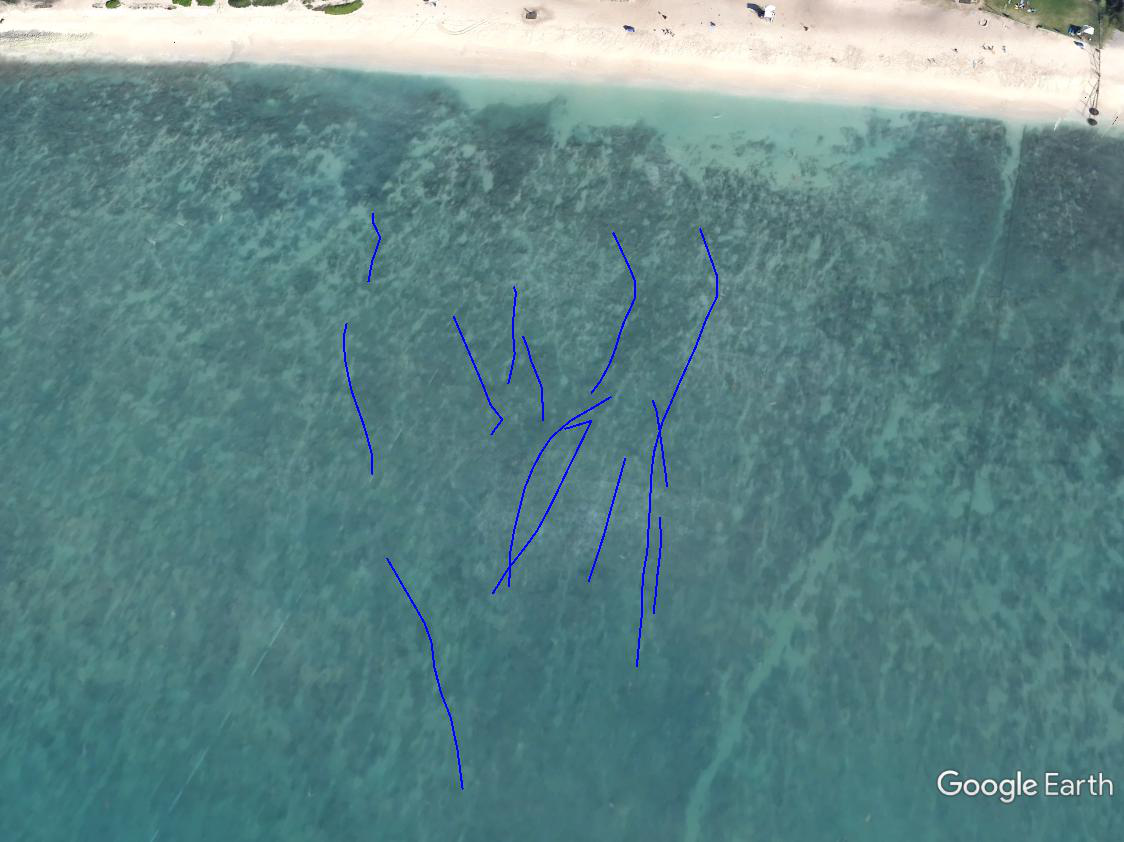
installed the Surf Tracker app and with a little coding was able to generate surf tracks on google earth and go from this

to this

what I used (windows 10, surf tracker app, garmin connect iq web site, python 2.7, and google earth pro. except for win 10, everything else is free)
basic steps
1) install the wave tracker app on your device
2) sync your device with connect IQ
3) download the files from connect IQ to your desktop/laptop
4) process the files to generate individual ride data
5) generate kml files and upload to google earth
1) from connect IQ download and install the surf tracker app on your device (vivoactive HR for me)
https://apps.garmin.com/en-US/apps/ded87d46-5477-4ca7-a247-847b896393e0
2) once you have recorded a surf session, sync your device and the activity will show up in your garmin connect dashboard looking something like the first picture
3) There are python scripts out there that will log into the garmin web site and batch download your activity files. I found these two references to be very helpful and modified to suit my needs.
- Kyle Krafka (https://github.com/kjkjava/)
- Johannes Heinrich (https://github.com/JohannesHeinrich/)
4) Wrote a python script to process the data in each downloaded file. Applies the same logic to the raw data (one data point per second) to determine which points represent when you are riding a wave. currently using faster than 9 kph for at least 6 seconds.
which format to download?
choices are .fit (original), tcx or gpx. originally i downloaded the garmin data files in tcx format which is essentially an xml file as python coding to extract the raw data was easier for me. gpx is similar format. there are nuances between tcx and gpx data elements although both have basic time stamp, lat and long.
recently switch to downloading .fit files as it is the orginal file and found python library FitParse that could extract the data elements I needed.
https://github.com/dtcooper/python-fitparse
5) Wrote python script to convert the time stamp, lat / long data for each ride into kml format. then copy kml files to google earth.
old post (to be deleted)
left click the settings icon (gear icon upper right next to the lock icon) and choose “export to tcx”
From golden cheetah, click “Import data” and choose your .fit file

to this
what I used (windows 10, surf tracker app, garmin connect iq web site, python 2.7, and google earth pro. except for win 10, everything else is free)
basic steps
1) install the wave tracker app on your device
2) sync your device with connect IQ
3) download the files from connect IQ to your desktop/laptop
4) process the files to generate individual ride data
5) generate kml files and upload to google earth
1) from connect IQ download and install the surf tracker app on your device (vivoactive HR for me)
https://apps.garmin.com/en-US/apps/ded87d46-5477-4ca7-a247-847b896393e0
2) once you have recorded a surf session, sync your device and the activity will show up in your garmin connect dashboard looking something like the first picture
3) There are python scripts out there that will log into the garmin web site and batch download your activity files. I found these two references to be very helpful and modified to suit my needs.
- Kyle Krafka (https://github.com/kjkjava/)
- Johannes Heinrich (https://github.com/JohannesHeinrich/)
4) Wrote a python script to process the data in each downloaded file. Applies the same logic to the raw data (one data point per second) to determine which points represent when you are riding a wave. currently using faster than 9 kph for at least 6 seconds.
which format to download?
choices are .fit (original), tcx or gpx. originally i downloaded the garmin data files in tcx format which is essentially an xml file as python coding to extract the raw data was easier for me. gpx is similar format. there are nuances between tcx and gpx data elements although both have basic time stamp, lat and long.
recently switch to downloading .fit files as it is the orginal file and found python library FitParse that could extract the data elements I needed.
https://github.com/dtcooper/python-fitparse
5) Wrote python script to convert the time stamp, lat / long data for each ride into kml format. then copy kml files to google earth.
old post (to be deleted)
left click the settings icon (gear icon upper right next to the lock icon) and choose “export to tcx”
Extract the. tcx file into your
working directory
My last file name was 1550456722.tcx and 1,799 KB in size
The file is in xml format so you can read with text editor
I wrote a script in python to parse the file using beautifulsoup module and generate kml file using simplekml module
Import kml file into google earth pro
I wrote a python script that uses same logic as surf tracker to identify start and stop points and only keep data in between. happy to share if anyone is interested. leave me a comment.
alternatively you can use golden cheetah to import fit file, extract data points, save to csv file, apply logic to generate discrete waves (i.e. at least 6 seconds, minimum speed = 9kph) then upload to google earth.
From golden cheetah, click “Import data” and choose your .fit file
Progress stops half way (after validation). Click save
Should get import complete.
Click finish
Remove unwanted columns. [Right click, remove column]
[I use only 4 - time, speed, latitude, longitude]
Left click on “entire Activity” to highlight all the rows
Right click to copy and paste into excel spreadsheet.
Save as csv file (I use rawdata.csv)
I did not use Activity, Export to create the CSV file as
that only kept lat/long to 4 decimal places.
Using select activity I was able to capture 8 digits which plotted much
better
Extract data points to plot.
Save output to csv file. Header row "Latitude, Longitude"
From google earth pro, import csv fileMonday, January 16, 2017
Garmin Vivoactive HR
Have had the device for 3 weeks (as of 16 Jan 2016) . Use it for tracking steps, sleep, cycling, swimming, and golf so far.
About me - play golf once a week (sometimes more), swim laps couple times a week, go for casual bike rides on occasion.
In general does what i need it to do. However if I was serious about keeping track of all my data for analysis then not so good so far as mt data files got corrupted.
Good.
- Does what I need it to do.
Could be better
- Takes some getting used to on swiping or pushing a button to get to the screen that you want.
- Does not automatically change time zones (t does after sync).
- Golf tracking
Awful
- Syncing data. Data on watch, connect mobile app, and connect mobile via web from PC got out of sync. No way to recover.
Specifics
Data out of sync
Loaded mobile connect app on my iphone, created an account on garmin connect, and paired my device. was able to see my activities on my app on iphone. then after a week accessed & synced my device using garmin express on my PC (usb connection). Somehow the data got out of sync so what I saw via the garmin connect account via web from PC did not match what was on the garmin connect app on my phone. no overlapping data. For example steps for some days on the phone and other days via web access from PC.
What I noticed for golf was when you sync with garmin express the golf data file (xml format) stays on the device. however when you sync via the connect mobile app on the iphone, the data file gets removed. As there is limited space on the device (10MB), it makes sense to remove files after sync. However if it does with one app (iphone) but not with the other (garmin express) then that appears to be the cause oif my issue.
Golf
While you can download all the courses you want from the mobile app, the device only stores 4 courses at a time. When you get to the golf course, if the course you are playing is not one of the 4 loaded on your device, you need to you need sync.
Does not keep track of which tees you played from and only records score (not putts, FIR, /GIR, etc)
Once you sync with app the xml data file for the round is deleted from the device. Therefore you need to copy the file before you sync if you want to be able to analyze or edit the data on your own.
Subscribe to:
Posts (Atom)