Thursday, December 22, 2016

Miata NA (1991) Valve Gasket Replacement


Fairly straight forward procedure on my 91 Miata.

references

http://www.miata.net/garage/valvecover/index.html

https://www.youtube.com/watch?v=CBisuD6HeFo

Couple of my observations

 I did not have to mess with any electrical connections. By removing the two 12mm bolts, one on either side of the spark plug wire bracket, I was able to slide the cover out.

Be careful tightening the 3 inside bolts along the center line. I snapped the center bolt. After removing the valve cover I was able to easily back out the bottom 1/3 of the bolt. Initially I thought I might have to use a bolt extractor. Bolt was available at home depot (flange bolt M6 x 1.0mm x 40mm.

Bought a Sears craftsman "clicker style" in-lb torque wrench (on sale for $50) to eliminate guess work for tightening bolts to 43 - 78 INCH-lbs the second time around. Unfortunately it did not "click" no matter what torque setting. Reading the reviews (after I bought it of course) appears I was not the only one.
Bought gasket from O'Reilly's auto store. Fit fine. Gasket sealant does not come with despite what the salesman told me so another trip back to the store. Only later to realize I already had some.


Sunday, November 27, 2016

Telnet into VSTARCAM T6835WIP PnP IP Network Camera


Given Mirai malware was interested in my vulnerability and found the password on a russian web site (thanks google translate).  If I can figure it out then the "bad guys" already have it.  Therefore I feel comfortable sharing so folks can actually do something about it (i.e. change the password)

login: root
password: 2011vsta

on a windows 10 machine, used Putty

Host name: 192.168.0.192
Connection type: Telnet
Port: 23


typing in busbox at the # lists available functions
use chpasswd to change password

# chpasswd (enter chpasswd at #)
root:newpassword (on blank line enter root:'newpassword'

should get response
Password for 'root' changed

hit enter and ignore the message
chpasswd: missing new password

Tuesday, October 25, 2016

Scorpion Bay Surf Trip - Oct 2016

Preparations
- Read Baja Surf Guide or at least visit http://www.thesurfersguides.com. Lots of good advice.
- I bought a DSURF travel bag. 10' and holds 2 boards.  Bag got trashed by the airline on the return flight so something to consider if thinking about renting a bag.  Do not recommend the bag as need a sturdier canvas outer shell.
- No ATM's in San Juanico.  Several in Loreto

Getting there from Loreto Airport (as of Oct 2016)
-  3:15 minutes via highway 1 south, then west, then north.
-  Google maps/Garmin no good once you are north of  Ciudad Insurgentes.  Looks like it has been several years since last google earth/maps update.
- Watch out for two unmarked speed bumps as you drive through a small town 10 miles north of Ciudad Insurgentes.
- Take Las Barrancas exit (25.9939 N,-112.1162 W) about 55 miles/88km from Ciudad Insurgentes .  Follow signs to San Juanico.  About 45 minutes to town of San Juanico


Driving/Roads
- Roads were in good shape, mostly.  Paved all the way except for spots when when they were not.
- Roads are narrow and drop off with very little shoulder.  If you need to bail right to make room for an on coming truck, careful you don't get a tire over the edge.
-  Take it easy heading south from Loreto as lots of hills and winding roads.  Only policia I saw was 10 minutes south of  the airport.
- You can make good time once you turn west and then north as roads were straight and in good shape, mostly
-  Roads were washed out in several places so road conditions can go from perfect asphalt to 2 foot drop off without warning.

Surf
- mostly surfed 2nd point.  occasional waist high.  a bit crowded as more folks (~10 - 12) waiting at the point than waves in a set.  mostly friendly with better surfers somehow not managing to wait in the line up

Scorpion Bay Hotel
- Good news A/C and Wifi
- Bad news they shut the power off at 11 pm most nights so obviously no A/C or Wifi
- rooms were nice and staff friendly
- Wifi was a shared connection so limited bandwidth.  no streaming.

Remote Desktop Connection Black Screen Raspberry Pi [solved]

Readers Digest version:  Change resolution in the /boot/config,txt file

Long version

Replaced motherboard on my desktop to include installing new graphics drivers.

Tried to RDC into the Pi and got the black screen.  Connection was OK as I could SSH in.

sudo nano /boot/config.txt

had to change both the overscan (top,bottom, left, and right) as well as hdmi_group and _mode.

http://www.opentechguides.com/how-to/article/raspberry-pi/28/raspi-display-setting.html

Monday, August 15, 2016

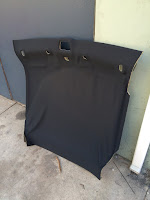
Porsche Cayman headliner replacement

2008 headliner started sagging last week.  Lots of google searches later here is my story.

I removed and replaced the headliner section and had an upholstery shop replace the actual liner for $150.  For me it made sense (at the time) to have someone else mess with preparing the surface (remove old foam), applying the glue, and getting the contours fitted properly.

Looking back, it was not that difficult but not sure how much i saved by doing the remove/replace labor myself.  It is a tight fit getting the headliner out so need to take your time as easy to scratch the pillars.

 two helpful you tube videos.

https://youtu.be/iZHIeiUFXJg

https://youtu.be/HZVlMKG3UKo  (before you complain about the video quality, try taking video yourself while performing this procedure)

Hardest part by far was separating the A and C pillars.  everything else was easy.


looking towards the back,

looking down
I started with the C pillar first. I did not remove the whole thing, just unclipped the section closest to the A pillar.  step 1 was removing the trim from around the seat belt feed behind the seat.  there are 4 tabs and 2 slots.  I started with the tab closet to the outside of the car.  insert a plastic trim tool in the gap and rotate.  this technique worked for the 4 tabs.  pried up for the 2 slots in the back. remove one star bolt. i used 7/64 hex.


this was the hardest part.  separating the 3 tabs connecting the A and C pillars.  Although I took out the light, I did not need to as there is enough play in the wire.  circle 4 is the one fastener I did unhook to prove enough play to allow a pillar trim to slide past c pillar trim.  it looked a little tight in the video where they did not remove it.


this is a view of the 3 fasteners on the A pillar trim piece that connects with the C pillar trim piece.  bottom of the picture is also bottom of the trim piece. looking at inside of drivers side piece.


once C pillar trim piece was loose, pulled the A pillar trim away from the car at each slot starting with the one closest to the back of the car.  careful with position 5.  need to pull away from the car but also, once loose pull trim piece towards the back of the car so as not to damage the tab on the end.

 5 slots where the A pillar fasteners line up


drivers side A pillar trim with location of fasteners.  on both sides, the fastener in position 5 stayed on the frame.  used needle nosed pliers to extract and fit back onto trim piece.  nothing broken.

after A pillars, removed sun visors, light, and garage door remote.


for sun visor, remove plastic cover then unscrew.


on the clip. pull down the plastic cover to reveal screw.


for the light, two tabs at the front.  you do not need to disconnect the wires as assembly fits through the opening


tabs for the garage remote are on each side.  no need to remove wires as assembly fits through the opening


removal/replacement.  pushed both the light and garage door opener through the headliner and was able to slide out the passenger side door.
would have been easier with  a helper during replacement.


Wednesday, April 6, 2016

IP Camera on Raspberry Pi 3 using motioneye [updated 9/3/2017]


Hardware: Raspberry Pi 3
Camera: VSTARCAM T6835WIP PnP IP Network Camera
OS: Linux raspberrypi 4.9.41-v7+ from NOOBS 2.4.3 [Raspian 9.1 stretch]

update

fresh os install on new sd card and ran into issues trying to load motioneye following the instructions on https://github.com/ccrisan/motioneye/wiki/Install-On-Raspbian

sudo apt-get install libssl-dev libcurl4-openssl-dev python-dev
sudo apt-get install motion ffmpeg v4l-utils # v4l the l is a lower case L


sudo pip install motioneye


sudo pip install --upgrade --force-reinstall pillow
sudo apt-get install libjpeg-dev


sudo mkdir -p /etc/motioneye
sudo mkdir -p /var/lib/motioneye
sudo cp /usr/local/share/motioneye/extra/motioneye.conf.sample /etc/motioneye/motioneye.conf
sudo cp /usr/local/share/motioneye/extra/motioneye.systemd-unit-local /etc/systemd/system/motioneye.service
 systemctl daemon-reload
 systemctl enable motioneye
 systemctl start motioneye


mkdir -p /var/lib/motioneye
cp /usr/local/share/motioneye/extra/motioneye.conf.sample /etc/motioneye/motioneye.conf

 cp /usr/local/share/motioneye/extra/motioneye.systemd-unit-local /etc/systemd/system/motioneye.service


did not run the following as sudo.  at the prompt, selected pi and entered the password

systemctl daemon-reload
 systemctl enable motioneye
 systemctl start motioneye


[old post]


set up raspberry pi with Raspian OS according to user guide


sudo apt-get update

sudo apt-get upgrade  'patience while it loads

[following is from https://github.com/ccrisan/motioneye/wiki/Install-On-Raspbian.  I have listed the commands I used.  the wiki has notes that may apply to your situation.  ]

'commands require root use sudo or become root using sudo -i

1. ffmpeg


wget https://github.com/ccrisan/motioneye/wiki/precompiled/ffmpeg_2.8.3.git325b593-1_armhf.deb

dpkg -i ffmpeg_2.8.3.git325b593-1_armhf.deb

2. install motion

apt-get install motion

3. Install the dependencies from the repositories:

apt-get install python-pip python-dev curl libssl-dev libcurl4-openssl-dev libjpeg-dev

4. Install motioneye


pip install motioneye

5. Prepare the configuration directory

mkdir -p /etc/motioneye

cp /usr/local/share/motioneye/extra/motioneye.conf.sample /etc/motioneye/motioneye.conf

6. Prepare the media directory:


mkdir -p /var/lib/motioneye

7. Add an init script, configure it to run at startup and start the motionEye server:

cp /usr/local/share/motioneye/extra/motioneye.systemd-unit-local /etc/systemd/system/motioneye.service

systemctl daemon-reload

systemctl enable motioneye

systemctl start motioneye

8. To upgrade to the newest version of motionEye :


pip install motioneye --upgrade

systemctl restart motioneye

9. open motioneye

from web browser enter "http://[your raspberry pi ip address]:8765"

10. add camera

[update 6/20/2021]

url =  http://192.168.0.121:81/videostream.cgi?
username = admin [default for my Win T-6835WIP]
password = [your password]

[recommend you test out the connection to your IP camera [i used yawcam and iSpy64] from your laptop/desktop first so you know it is working.  i needed to enter my user name and password in the url only, not the user name and password blocks.  if i just entered in the user name and password blocks I got a "camera not supported error]


camera type = network camera

url = http://[ip camera address]:port/videostream.cgi?user=[username]&pwd=[password]"

'example http://192.168.0.199:81/videostream.cgi?user=USERNAME&pwd=PASSWORD"

user name = leave blank as included above

password = leave blank as included above


'enjoy


Friday, January 1, 2016

Mighty Miata

06/23/17 216257
- water coolant inlet flange  $120
- coolant hose NA01-61-212A $20

04/20/17
- rear finish panel $200

12/21/2016  212,816
- valve cover gasket  $22
- spark plug wires $45

05/07/16 207,432
- Oil Change $25

01/01 2016  204,449 miles (8996 days)
- Replaced thermostat $10 DIY

10/25/15 203,173 miles
- replaced pcv $6
- wiper blades $20
- air filter $12
- spark plugs $28

05/15/15 199,320
-oil change $23

02/23/15
-heater hose $8

04/19/14
- cooling fan switch $31