uploading songs via music manager did not find my itunes folder even though it was in the default location
edit>preferences>advanced
check "share itunes library XML with other applications"
restart music manager
if you have your itunes library file somewhere else then take a look here
http://redballer.blogspot.com/2017/03/using-itunes-with-google-music-manager.html
Saturday, March 3, 2018
Saturday, January 20, 2018
Panasonic TC-50PU54 Power Supply Replacement
tv would not turn on. no power/no blinking lights/nothing
goolge search for troubleshooting tv power supplies reutned several good videos
https://www.youtube.com/watch?v=qxG3hmmvkJs
i was not getting any standby voltage on power supply board so decided to spend $25 on power supply on ebay before paying a tv repair ship or buying a new tv
replaced board and TV is working.
details
remove the back cover. easiest to have it lying face down on the floor
about 2 dozen screws. 3 sizes. all Phillips head

disconnect ribbon in lower right corner of power supply board (blue circle) and check for any voltage on the pins. i did not get any voltage on any pin so assumed bad board.
disconnect 4 other connectors (red circles). can do by hand.
remove 5 screws
replace board.
goolge search for troubleshooting tv power supplies reutned several good videos
https://www.youtube.com/watch?v=qxG3hmmvkJs
i was not getting any standby voltage on power supply board so decided to spend $25 on power supply on ebay before paying a tv repair ship or buying a new tv
replaced board and TV is working.
details
remove the back cover. easiest to have it lying face down on the floor
about 2 dozen screws. 3 sizes. all Phillips head

disconnect ribbon in lower right corner of power supply board (blue circle) and check for any voltage on the pins. i did not get any voltage on any pin so assumed bad board.
disconnect 4 other connectors (red circles). can do by hand.

remove 5 screws
replace board.
Wednesday, November 22, 2017
Nikon Super coolscan 4000 ed on windows 10
sources
http://blog.controlspace.org/2010/05/nikon-scan-on-windows-7-and-vista-64.html
https://axelriet.blogspot.com/2009/10/nikon-ls-40-ls-50-ls-5000-scanners-on.html
https://www.nikonimgsupport.com/na/NSG_article?articleNo=000026780&configured=1&lang=en_SG
desktop running windows 10 with firewire (1394) connection
basic steps to load nikon scan software
with scanner OFF
- download and install nikon software 4.0.3 (ns403en_vista.exe - see 3rd source above or google nikon 4.0.3)
- modify .inf file.; in my case i edited the Nks1394.INF file located in c:/program files(x86)/common files/nikon/driver/scan1394 directory. (text i used located)
turn scanner ON
- reboot windows allowing it to use unsigned drivers (write this down) settings/update and security/recovery/under advanced start up/restart now/ then press f7 during windows startup
- update driver. scanner should be visible in device manager under imaging devices as
Nikon SUPER COOLSCAN 4000 ED. choose browse my computer and navigate to the updated inf file
- software should now recognize scanner and work
[note - need to replace & with & in below]
; Nks1394.INF -- Windows Still Image Setup File of
; Nikon 1394 Scanners for Windows ME/2000/XP
; Copyright (C) Nikon Corporation 2003
; Manufacturer: Nikon Corporation
; scanners.inf - Windows Still Image Setup File
; modified inf file
[Version]
Signature="$CHICAGO$"
Class=Image
ClassGUID={6bdd1fc6-810f-11d0-bec7-08002be2092f}
Provider=%Provider%
DriverVer=1/1/2009,1.0
[Manufacturer]
%Mfg%=Models,ntamd64
[Models]
; USB scanners
"Nikon LS-40" = USBScanner,USB\Vid_04b0&Pid_4000
"Nikon LS-50" = USBScanner,USB\Vid_04b0&Pid_4001
"Nikon LS-5000" = USBScanner,USB\Vid_04b0&Pid_4002
; Firewire scanners
"Firewire Scanner" = SBP2Scanner,SBP2\GenScanner
"Nikon SUPER COOLSCAN 4000 ED" = SBP2Scanner_NIKON,SBP2\NIKON___&LS-4000_ED______&CMDSETID104D8
"Nikon SUPER COOLSCAN 8000 ED" = SBP2Scanner_NIKON,SBP2\NIKON___&LS-8000_ED______&CMDSETID104D8
"Nikon SUPER COOLSCAN 9000 ED" = SBP2Scanner_NIKON,SBP2\NIKON___&LS-9000_ED______&CMDSETID104D8
;---------------- Duplicated from [Models]
[Models.ntamd64]
; USB scanners
"Nikon LS-40" = USBScanner,USB\Vid_04b0&Pid_4000
"Nikon LS-50" = USBScanner,USB\Vid_04b0&Pid_4001
"Nikon LS-5000" = USBScanner,USB\Vid_04b0&Pid_4002
; Firewire scanners
"Firewire Scanner" = SBP2Scanner,SBP2\GenScanner
"Nikon SUPER COOLSCAN 4000 ED" = SBP2Scanner_NIKON,SBP2\NIKON___&LS-4000_ED______&CMDSETID104D8
"Nikon SUPER COOLSCAN 8000 ED" = SBP2Scanner_NIKON,SBP2\NIKON___&LS-8000_ED______&CMDSETID104D8
"Nikon SUPER COOLSCAN 9000 ED" = SBP2Scanner_NIKON,SBP2\NIKON___&LS-9000_ED______&CMDSETID104D8
;---------------- USBScanner -------------------------
[USBScanner]
Include=sti.inf
Needs=STI.USBSection
SubClass=StillImage
DeviceType=1
DeviceSubType=1
Capabilities=0
[USBScanner.Services]
Include=sti.inf
Needs=STI.USBSection.Services
;---------------- SBP2Scanner ------------------------
[SBP2Scanner]
Include=sti.inf
Needs=STI.SBP2Section
SubClass=StillImage
DeviceType=1
DeviceSubType=2
Capabilities=0
[SBP2Scanner_NIKON]
Include=sti.inf
Needs=STI.SBP2Section
SubClass=StillImage
DeviceType=1
DeviceSubType=2
Capabilities=0
AddReg=NK1394SCN.AddReg
CopyFiles=NK1394SCN.CopyUSDFiles
[SBP2Scanner.Services]
Include=sti.inf
Needs=STI.SBP2Section.Services
[SBP2Scanner_NIKON.Services]
Include=sti.inf
Needs=STI.SBP2Section.Services
[NK1394SCN.AddReg]
HKR,,HardwareConfig,1,2
HKR,,DevLoader,,*NTKERN
HKR,,NTMPDriver,,"scsiscan.sys"
HKR,DeviceData,ICMProfile,1,0,0
HKR,,USDClass,,"{07C71AC0-FA90-11d3-B409-00C04F87578E}"
HKCR,CLSID\{07C71AC0-FA90-11d3-B409-00C04F87578E},,,"Nikon STI USD"
HKCR,CLSID\{07C71AC0-FA90-11d3-B409-00C04F87578E}\InProcServer32,,,%11%\NKSCNUSD.DLL
HKCR,CLSID\{07C71AC0-FA90-11d3-B409-00C04F87578E}\InProcServer32,ThreadingModel,,"Both"
[SourceDisksNames]
1=%DiskName%,,
[SourceDisksFiles]
NKSCNUSD.dll=1
[DestinationDirs]
NK1394SCN.CopyUSDFiles=11
[NK1394SCN.CopyUSDFiles]
NKSCNUSD.dll,,,32
;-----------------------------------------------------
[Strings]
Provider="steelchn@gmail.com"
Mfg="DIY Software"
DiskName="Nikon Scan 4 CD-ROM"
;========================= End of scanners.inf ===============================
Saturday, November 4, 2017
google voice raspberry pi [pygooglevoice]
using pip install pygooglevoice i got an error something like
galx = re.search(r"name=\"GALX\"\s+value=\"(.+)\"", content).group(1)AttributeError: 'NoneType' object has no attribute 'group'
it worked when i download pygooglevoice-master fromhttps://github.com/pettazz/pygooglevoice
copy files into lib/site-packages from pygooglevoice foldersudo python setup.py install
Monday, October 2, 2017
Gopro Hero 5 tips & tricks
Copy files from Gopro to windows 10 PC retaining file creation date - use sd card reader vice copying from hero connected via usb. richcopy utility seems faster than drag/drop from windows 10
in case it gets lost - create a jpg file with your return info and save in root directory on sd card as readme.jpg. a long shot but at least info is there if someone tries to look for the owner.
in case it gets lost - create a jpg file with your return info and save in root directory on sd card as readme.jpg. a long shot but at least info is there if someone tries to look for the owner.
Wednesday, September 27, 2017
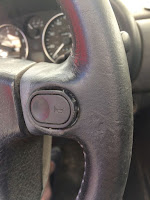
Miata NA Horn Button Repair

My left horn button was working so this narrowed it down to the right horn button or wiring. i did not have to remove the steering wheel or mess with the airbag
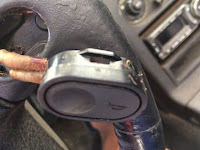
Step 1 - pry out the button. I used a plastic trim remover tool. as others have stated, patience and persistence. working around the edges it slowly starts to come out. used a fair amount of force pushing up/down against the bottom/top of plastic button then towards me.

This is the tab (one on the top one on the bottom) that holds the button into place.
i was getting 12v across the wires so power was good. after removal, i was getting resistance across the wires when the button was depressed so that confirmed it was the button
i tried the spraying electrical cleaner advice - multiple times over several days and button presses (100) with no joy.
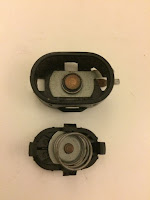
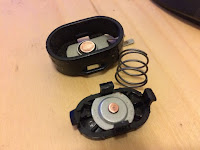
Step 2 - from the back side push the tabs in and up. i only needed to do three so did not have to deal with the one under the connectors. you can do this sequentially.


Step 3 - used sandpaper to clean the copper connectors on each side.


Step 4 - confirm resistance goes to zero when pressed. you can remove the circular connector on the back side of the button which allows you to press it against the other side without having to snap it back together before confirming good connectivity
Step 5 - re install the button, enjoy a sense of accomplishment and try to forget about your $10 ebay purchase of new (to me) buttons w/ wiring. it was knowing i had a new button coming that allowed me to try and separate the existing button. while hinted at in one post, was not obvious to me.
Sunday, September 17, 2017
Raspberry Pi projects
Hardware: Raspberry Pi 3, webcam, ip camera
Software: NOOBS 2.4.3 Raspian (Jessie stretch)
Note: Use a power supply vice a iphone or other "charger". the led should be solid RED indicating good power vice blinking.
- record motion triggered surveillance video to NAS from webcam & ip camera using motion/motioneye.
- text me my estimated morning/evening commute time using google maps api
- email me the weather forecast if there is a chance of rain
- plot surf tracks on google earth using garmin vivoactive hr lat/lon data
- monitor cable modem data to troubleshoot connectivity issues
Software: NOOBS 2.4.3 Raspian (Jessie stretch)
Note: Use a power supply vice a iphone or other "charger". the led should be solid RED indicating good power vice blinking.
Current Projects
- record motion triggered surveillance video to NAS from webcam & ip camera using motion/motioneye.
- text me my estimated morning/evening commute time using google maps api
- email me the weather forecast if there is a chance of rain
- plot surf tracks on google earth using garmin vivoactive hr lat/lon data
Past projects
- monitor cable modem data to troubleshoot connectivity issues
Subscribe to:
Posts (Atom)